Passive v. Active Reconnaissance
What is Reconnaissance in 'Hacking Terms'?
Webster’s defines Reconnaissance as ‘a preliminary survey to gain information.’ Being extremely beneficial to learn your target before you can effectively exploit and gain system level access, this definition perfectly fits the first step of the Ethical-Hacker’s-Methodology. The key to good reconnaissance is knowing the fine boundary between active recon and passive recon. Within this blog post, I will describe both and teach you how to determine the difference.
Passive Reconnaissance
The act of performing reconnaissance passively is tricky. You must gather information without directly interacting with your target. How is this even possible you may ask? Quite easy in fact, thanks to the power and resources of Open Source Intelligence (OSINT). ‘Open Source’ meaning openly available to anyone who is willing to search for it. In fact, the most powerful OSINT tool is one you probably already use on a daily basis - search engines like Google and DuckDuckGo.
When using a search engine to perform passive recon and accrue OSINT, Google is your best friend and greatest ally. Thanks to Google’s handy advanced-searching features and built-in search line commands, you can truly master the art of ‘Google-Fu’ as some call it. Other passive recon tools can provide more direct information rather than just a powerful search filter. Some of my favorite tools include the following:
- WHOIS -
‘WHOIS’ - a query tool that is used primarily used for searching online domain registrar databases for domain names, IP address block assignments, webmaster contact information, and much more if publicly available! There are multiple websites that can perform this, however, more conveniently Linux CLI is capable of performing the same function. Debian Linux distro install and use instructions:
sudo apt install whois
whois --help
Since Google is our best friend when it comes to OSINT, lets run a test WHOIS search from the CLI on ‘google.com’ as an example. See below for the generated output as of Aug 10, 2022. This data can change depending on the domain registration, but it is all publicly known and can be queried at any time.
──(root㉿kali)-[/home/kali]
└─# whois google.com
   Domain Name: GOOGLE.COM
   Registry Domain ID: 2138514_DOMAIN_COM-VRSN
   Registrar WHOIS Server: whois.markmonitor.com
   Registrar URL: http://www.markmonitor.com
   Updated Date: 2019-09-09T15:39:04Z
   Creation Date: 1997-09-15T04:00:00Z
   Registry Expiry Date: 2028-09-14T04:00:00Z
   Registrar: MarkMonitor Inc.
   Registrar IANA ID: 292
   Registrar Abuse Contact Email: abusecomplaints@markmonitor.com
   Registrar Abuse Contact Phone: +1.2086851750
   Domain Status: clientDeleteProhibited https://icann.org/epp#clientDeleteProhibited
   Domain Status: clientTransferProhibited https://icann.org/epp#clientTransferProhibited
   Domain Status: clientUpdateProhibited https://icann.org/epp#clientUpdateProhibited
   Domain Status: serverDeleteProhibited https://icann.org/epp#serverDeleteProhibited
   Domain Status: serverTransferProhibited https://icann.org/epp#serverTransferProhibited
   Domain Status: serverUpdateProhibited https://icann.org/epp#serverUpdateProhibited
   Name Server: NS1.GOOGLE.COM
   Name Server: NS2.GOOGLE.COM
   Name Server: NS3.GOOGLE.COM
   Name Server: NS4.GOOGLE.COM
   DNSSEC: unsigned
   URL of the ICANN Whois Inaccuracy Complaint Form: https://www.icann.org/wicf/
>>> Last update of whois database: 2022-08-10T19:25:39Z <<<
- Shodan -
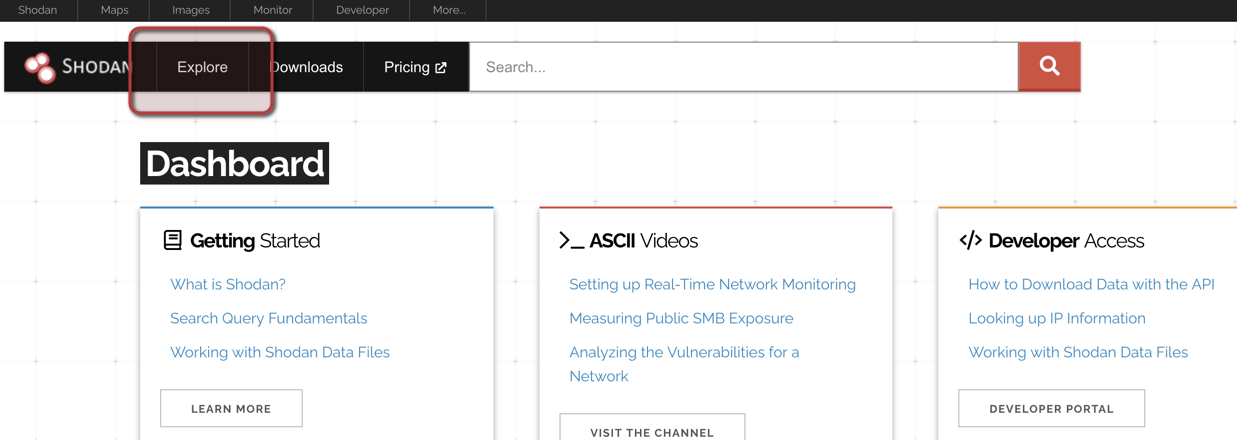
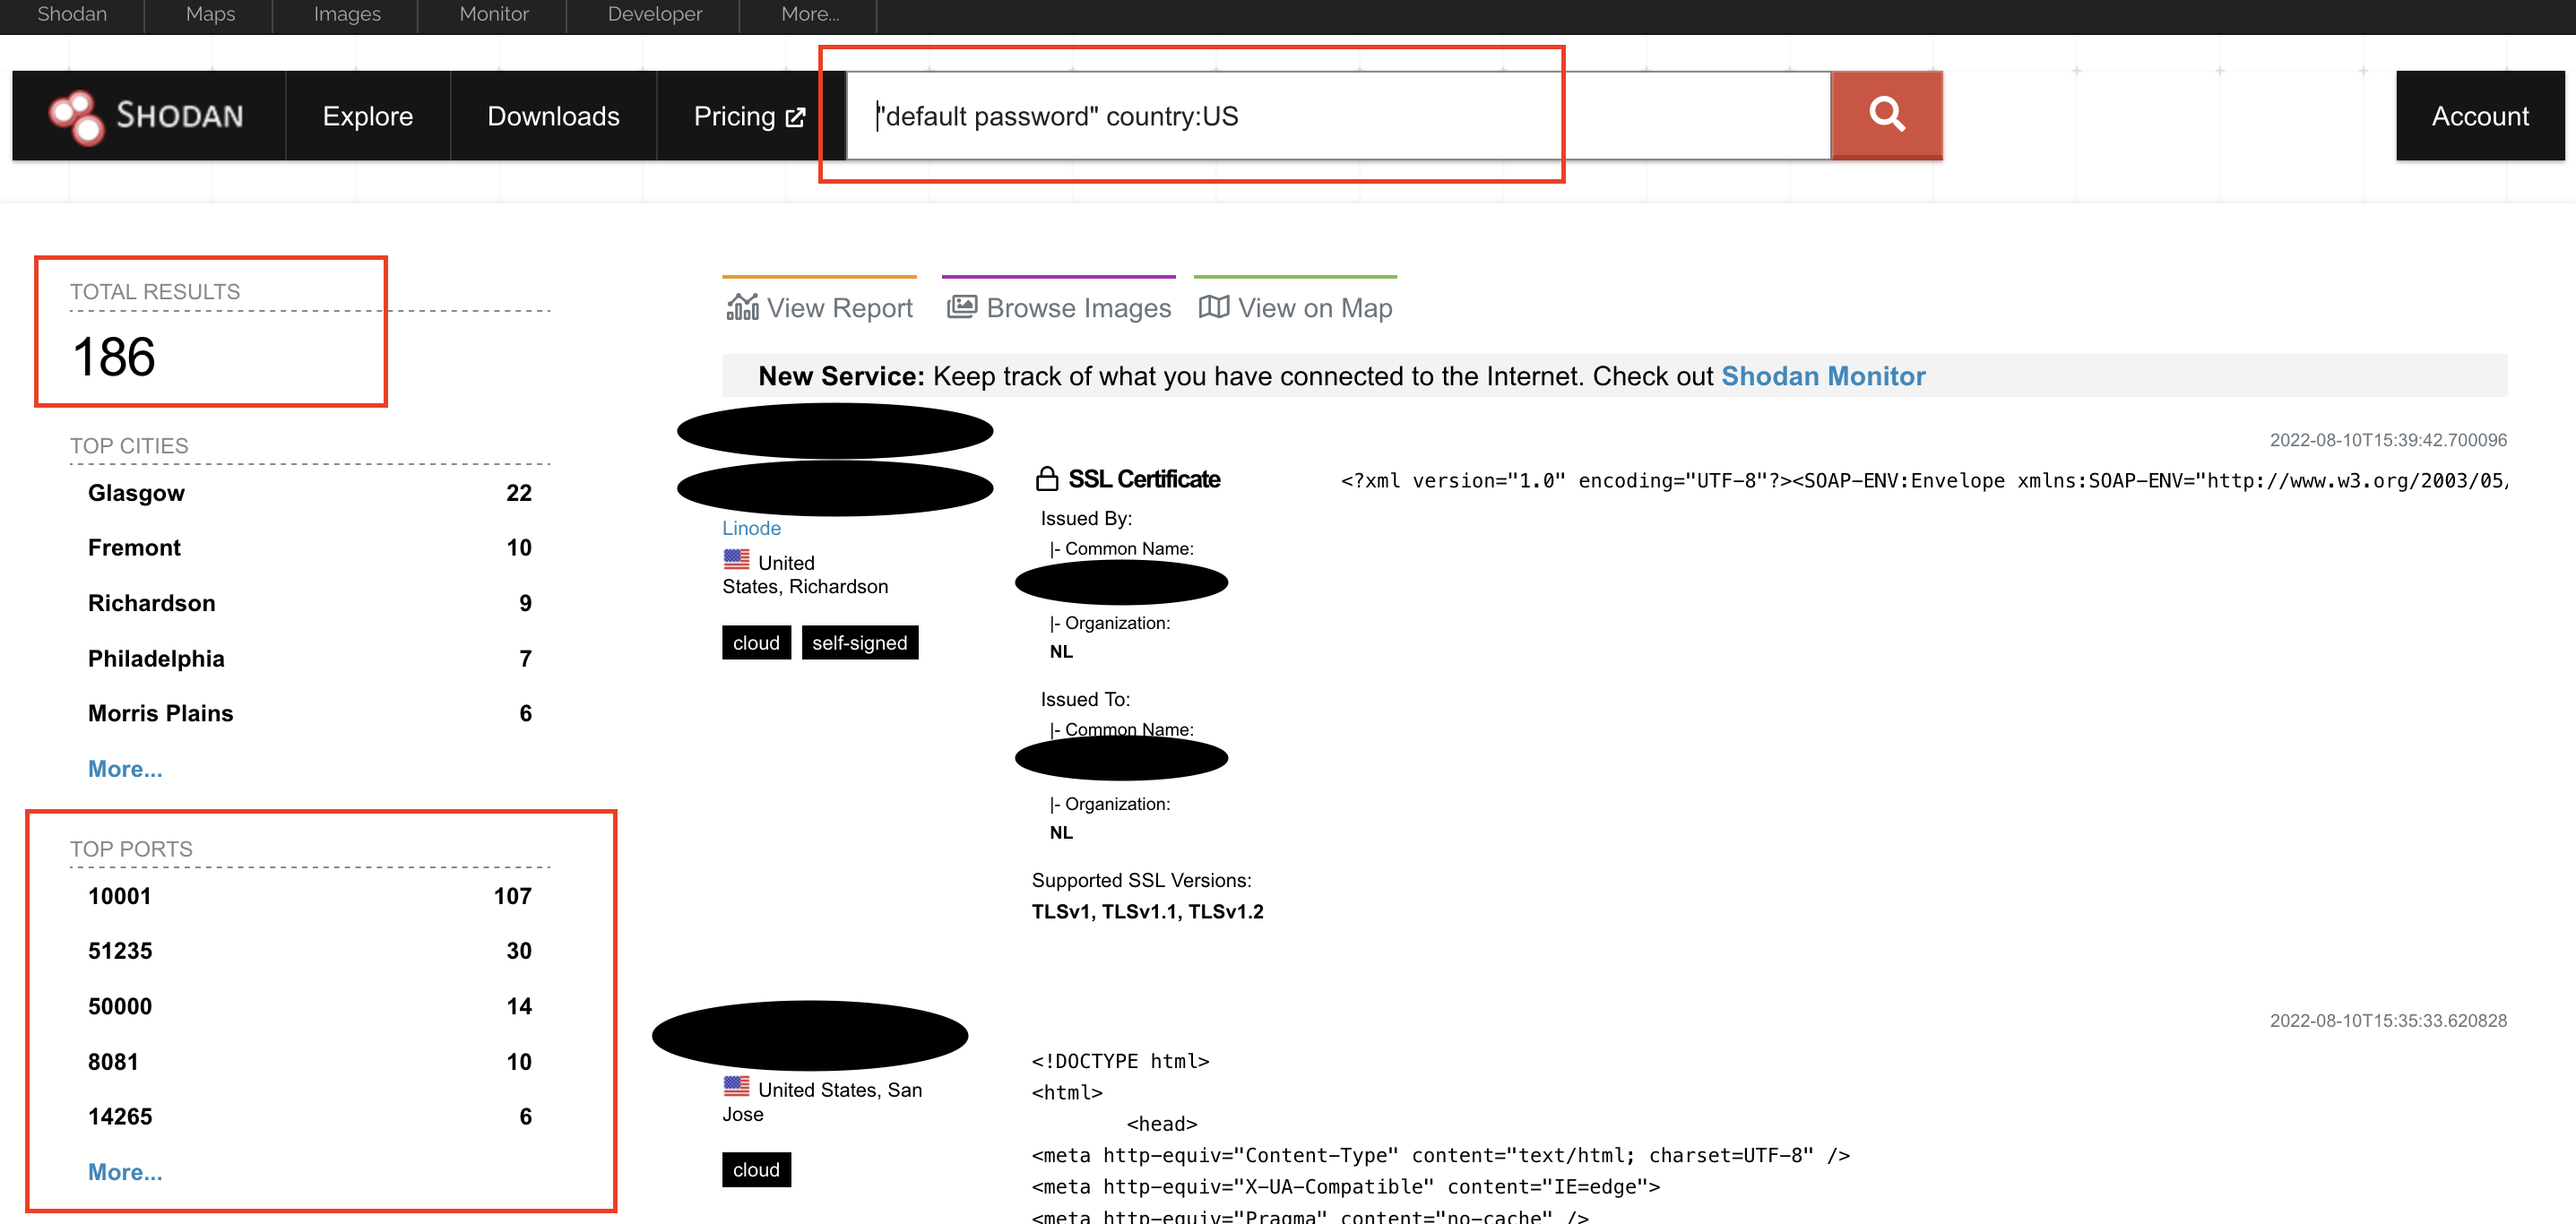
A revolutionized search engine all on its own, Shodan markets itself as ‘a complete picture of the internet.’ Shodan allows users to search for various public facing internet devices with a variety of filters such as servers, webcams, metadata, etc. Shodan is a bit tricky to show an exact example of other than providing direct screenshots. Rather than try and describe the power of Shodan and explain it’s intricacies, here are some screenshots what the current UI looks like, and how the search results are shown. As an example, we’ll perform a simple search on public facing devices within the US with the default password still used.
First, click the explore tab from the main Shodan dashboard.
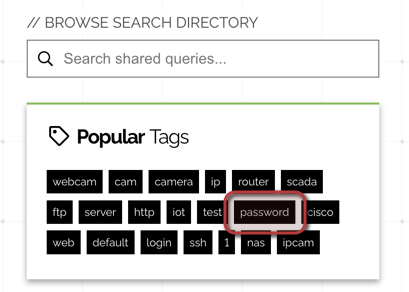
Next, click on the ‘password’ tag. This shows up by default since it’s a relatively quick and easy tag that is used by many.
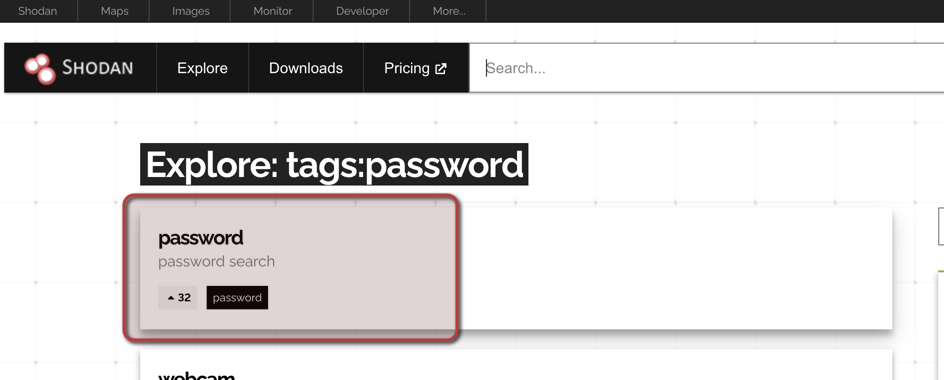
This first selection is just a basic search on systems with a default password. No additional querying of system type. Since this is what we’re looking for in our example, we’ll select this.
Now, you can see all of your results! Each IP address shown is a public facing system with a default password used. Scary.. right??
- Dehashed -
Dehashed is a one-stop-shop for breached/leaked usernames/emails/passwords/etc. that have all been publicly disclosed. Seeing the convenience of this service, there is unfortunately a strict paywall. Although this service is worth every penny when performing passive reconnaissance, there are alternative free options such as ‘HaveIBeenPwnd’ and ‘WeLeakInfo.’
- WiGLE -
Wireless passive recon.. in a browser? Yes. WiGLE is extremely powerful and useful. In fact, you can geo-locate any SSID that has been broadcast, search SSID specifically, filter on density, etc. Properly known by the tagline ‘All the networks. Found by everyone.’ WiGLE is a powerful passive recon tool if the geo-location of your target has already been obtained and is known.
Although the web-tool is fairly self-explanatory once you get your hands on it, I screenshot a couple search examples to show what you’ll see and just how powerful WiGLE is. When you first arrive at the webpage, WiGLE will ask for your location to easily shift the map to your current location. ‘Allow’ or ‘Block’ is completely your preference as I’m sure you’ll be able to locate yourself on a map if you know your current location! The map, without any search criteria will look something like this:
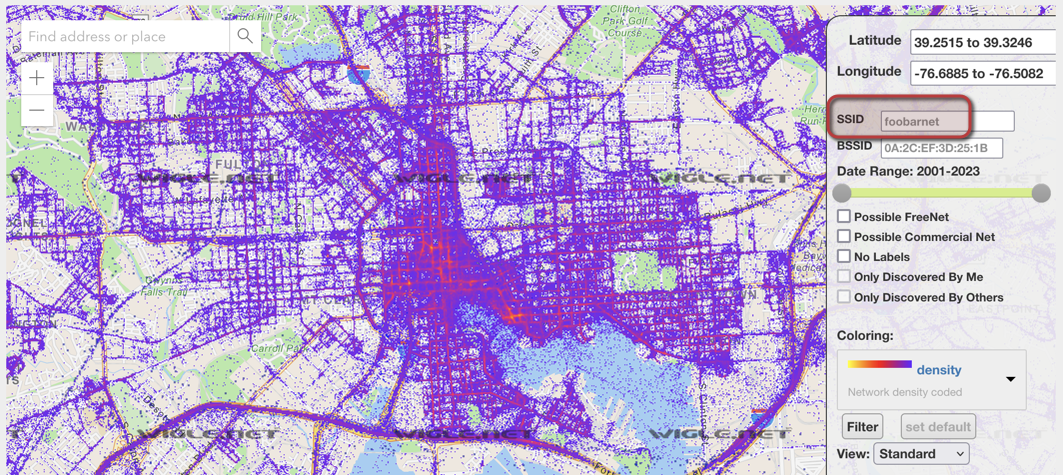
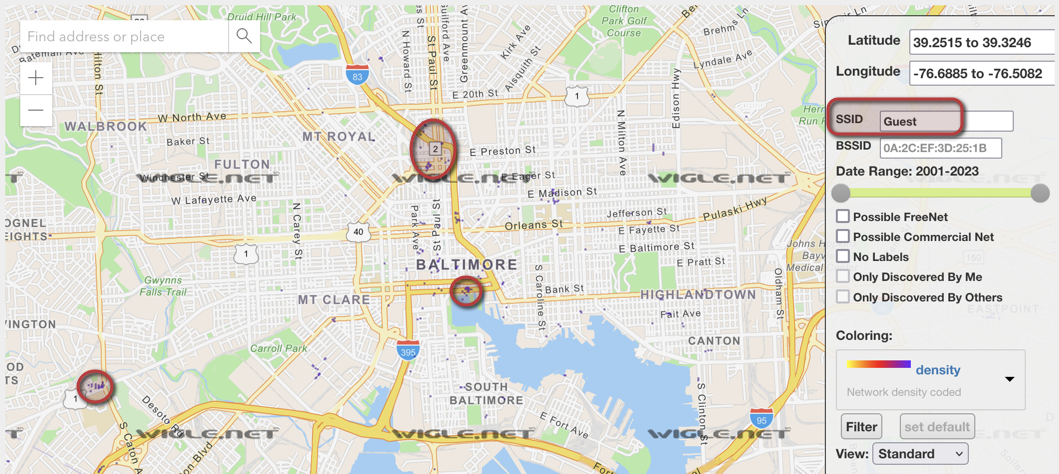
As you can see, it’s nearly impossible to easily locate any individual wireless network since all found are a giant purple ‘blob’ and overlap each other. Simply providing an SSID within the serach criteria severely lowers results and allows you to easily locate a desired wireless network! Think of it like… passive war-driving! Here’s an example of simply searching for ‘Guest’ as the SSID, allowing you to pinpoint exactly where a “Guest” wireless network is being broadcast.
Active Reconnaissance
Compared to passive, active reconnaissance can be a bit more fun. With the intent to dig deeper on information found within passive recon, active reconnaissance is used to gather information such as the OS type/version, open ports within a network attached host, services actively running on network attached hosts, finding vulnerabilities within applications, and much more! Due to the nature of the act, the downside of active reconnaissance is the potential to trigger an IPS/IDS, alerting the victim organization of your intent. Because of this, active reconnaissance is malicious if not within the confines of a SOW or legal contract since a direct connection is performed to a victim’s network property.
** DO NOT perform Active Reconnaissance on a target without written permission and consent. The author of this article will not be held responsible for the malicious use of tools/methods referred to in this article. **
- nmap -
Active recon can be performed in a multitude of ways. One of the most well known and utilized tools is Network Mapper, otherwise known as ‘nmap.’ Nmap is a command line tool utilized for scanning and enumerating on network IP addresses and IP address ranges. With a multitude of features, nmap can scan open ports on a single host, or all hosts within a specified subnet at different speeds/variations/etc. An entire blog post could be written on nmap alone. However, here’s a link to the nmap-documentation to check out the details!
As an example, say we wanted to perform a port scan on a host we know exists at IPv4 address 10.10.10.10 on a 255.255.255.0 subnet. To determine what ports are open from a basic level, within the most common 1000 ports, our syntax would look like the following:
┌──(root㉿kali)-[/home/kali]
└─# nmap 10.10.10.10
Seeing as this scan is rather basic, lets add a bit of complexity to gather some better results. To that point, lets say the above scan produces no response and nmap says the host isn’t alive (or ‘up’ and online). Adding some additional flags may increase our changes in getting some feedback. Lets take a look at some helpful flags to use for successful nmap scanning while performing active reconnaissance:
## Selected output from 'nmap --help' ##

-T<0-5>: Set timing template (higher is faster)
-sV: Probe open ports to determine service/version info
-v: Increase verbosity level (use -vv or more for greater effect)
-p <port ranges>: Only scan specified ports (-p- indicates ALL 65535 ports)


┌──(root㉿kali)-[/home/kali]
└─# nmap -T3 -sV -v 10.10.10.10 -p-
Starting Nmap 7.92 ( https://nmap.org ) at 2022-08-10 15:08 EDT
NSE: Loaded 45 scripts for scanning.
Initiating Ping Scan at 15:08
Scanning 10.10.10.10 [4 ports]
Completed Ping Scan at 15:08, 0.03s elapsed (1 total hosts)
Initiating Parallel DNS resolution of 1 host. at 15:08
Completed Parallel DNS resolution of 1 host. at 15:08, 0.01s elapsed
Initiating SYN Stealth Scan at 15:08
Scanning 10.10.10.10 [65535 ports]
SYN Stealth Scan Timing: About 17.19% done; ETC: 15:11 (0:02:29 remaining)
Stats: 0:00:36 elapsed; 0 hosts completed (1 up), 1 undergoing SYN Stealth Scan
SYN Stealth Scan Timing: About 20.88% done; ETC: 15:10 (0:02:13 remaining)
Since our first scan without flags provided no results, we included the ‘-T3’, ‘-sV’, ‘-v’, and ‘-p-‘ flags. Each of these are important for an effective scan when a basic provides no output.
'-T3' --> slows the scan down so an IPS/IDS is less likely to detect activity
'-sV' --> probes the target to see if a version number can be determined for each service found on its respective port number.
'-v' --> shows the verbosity of the scan, which shows progress along the way (seen from "SYN Stealth Scan Timing: About ….")
'-p-' --> scans every single known port. This is because in the first scan, no results were found. It could've been that the victim admins adjusted services to run on non-standard ports. By adding '-p-' we are checking all of them just to be sure.
- Nessus -
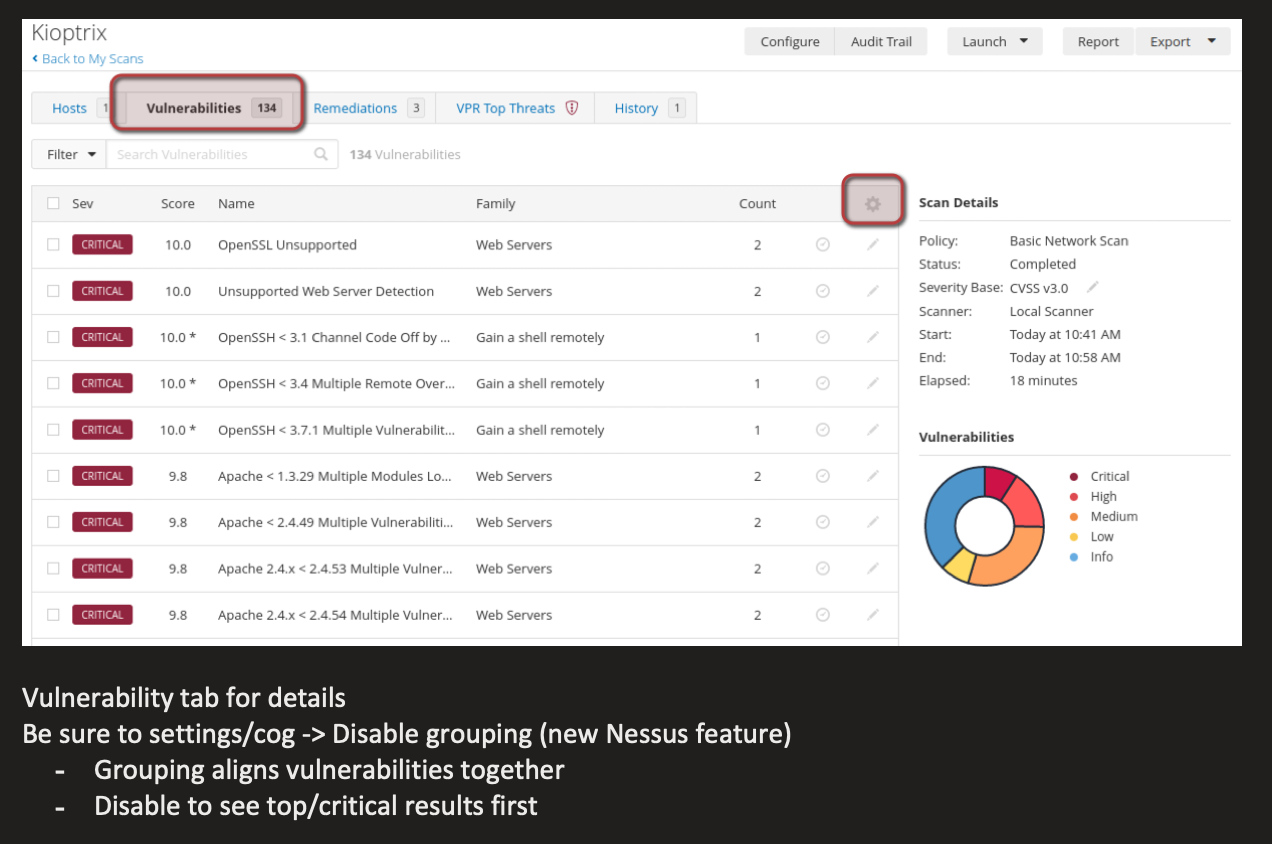
One other well known active reconnaissance tool is Nessus. This popular vulnerability assessment tool can be installed and utilized on a wide range of platforms, and be uniquely configured to identify critical vulnerabilities. Due to nature of the tool, the use of it is quite intrusive and can trigger alerts on a victim network/organization if in place. Based on the gathered data, Nessus will generate reports on the vulnerabilities it detects within a network and provide a list with severity ranging from Critical to Informational. These reports can be vital when drafting a final write-up for a client presentation on findings throughout the penetration test. Nessus does however require a license for professional level features, yet is a must-have for any professional Penetration Tester’s arsenal.
As a practical example of Nessus, I setup a known vulnerable VM known as Kioptrix and ran a Nessus scan against it. I generated a vulnerability report and took a screencap of my notes during my own active recon phase of my practice assessment. See below as an example of how vital it is to provide a client with a fully formatted vulnerability report, classifying each into their own severity category!
Conclusion and Summary
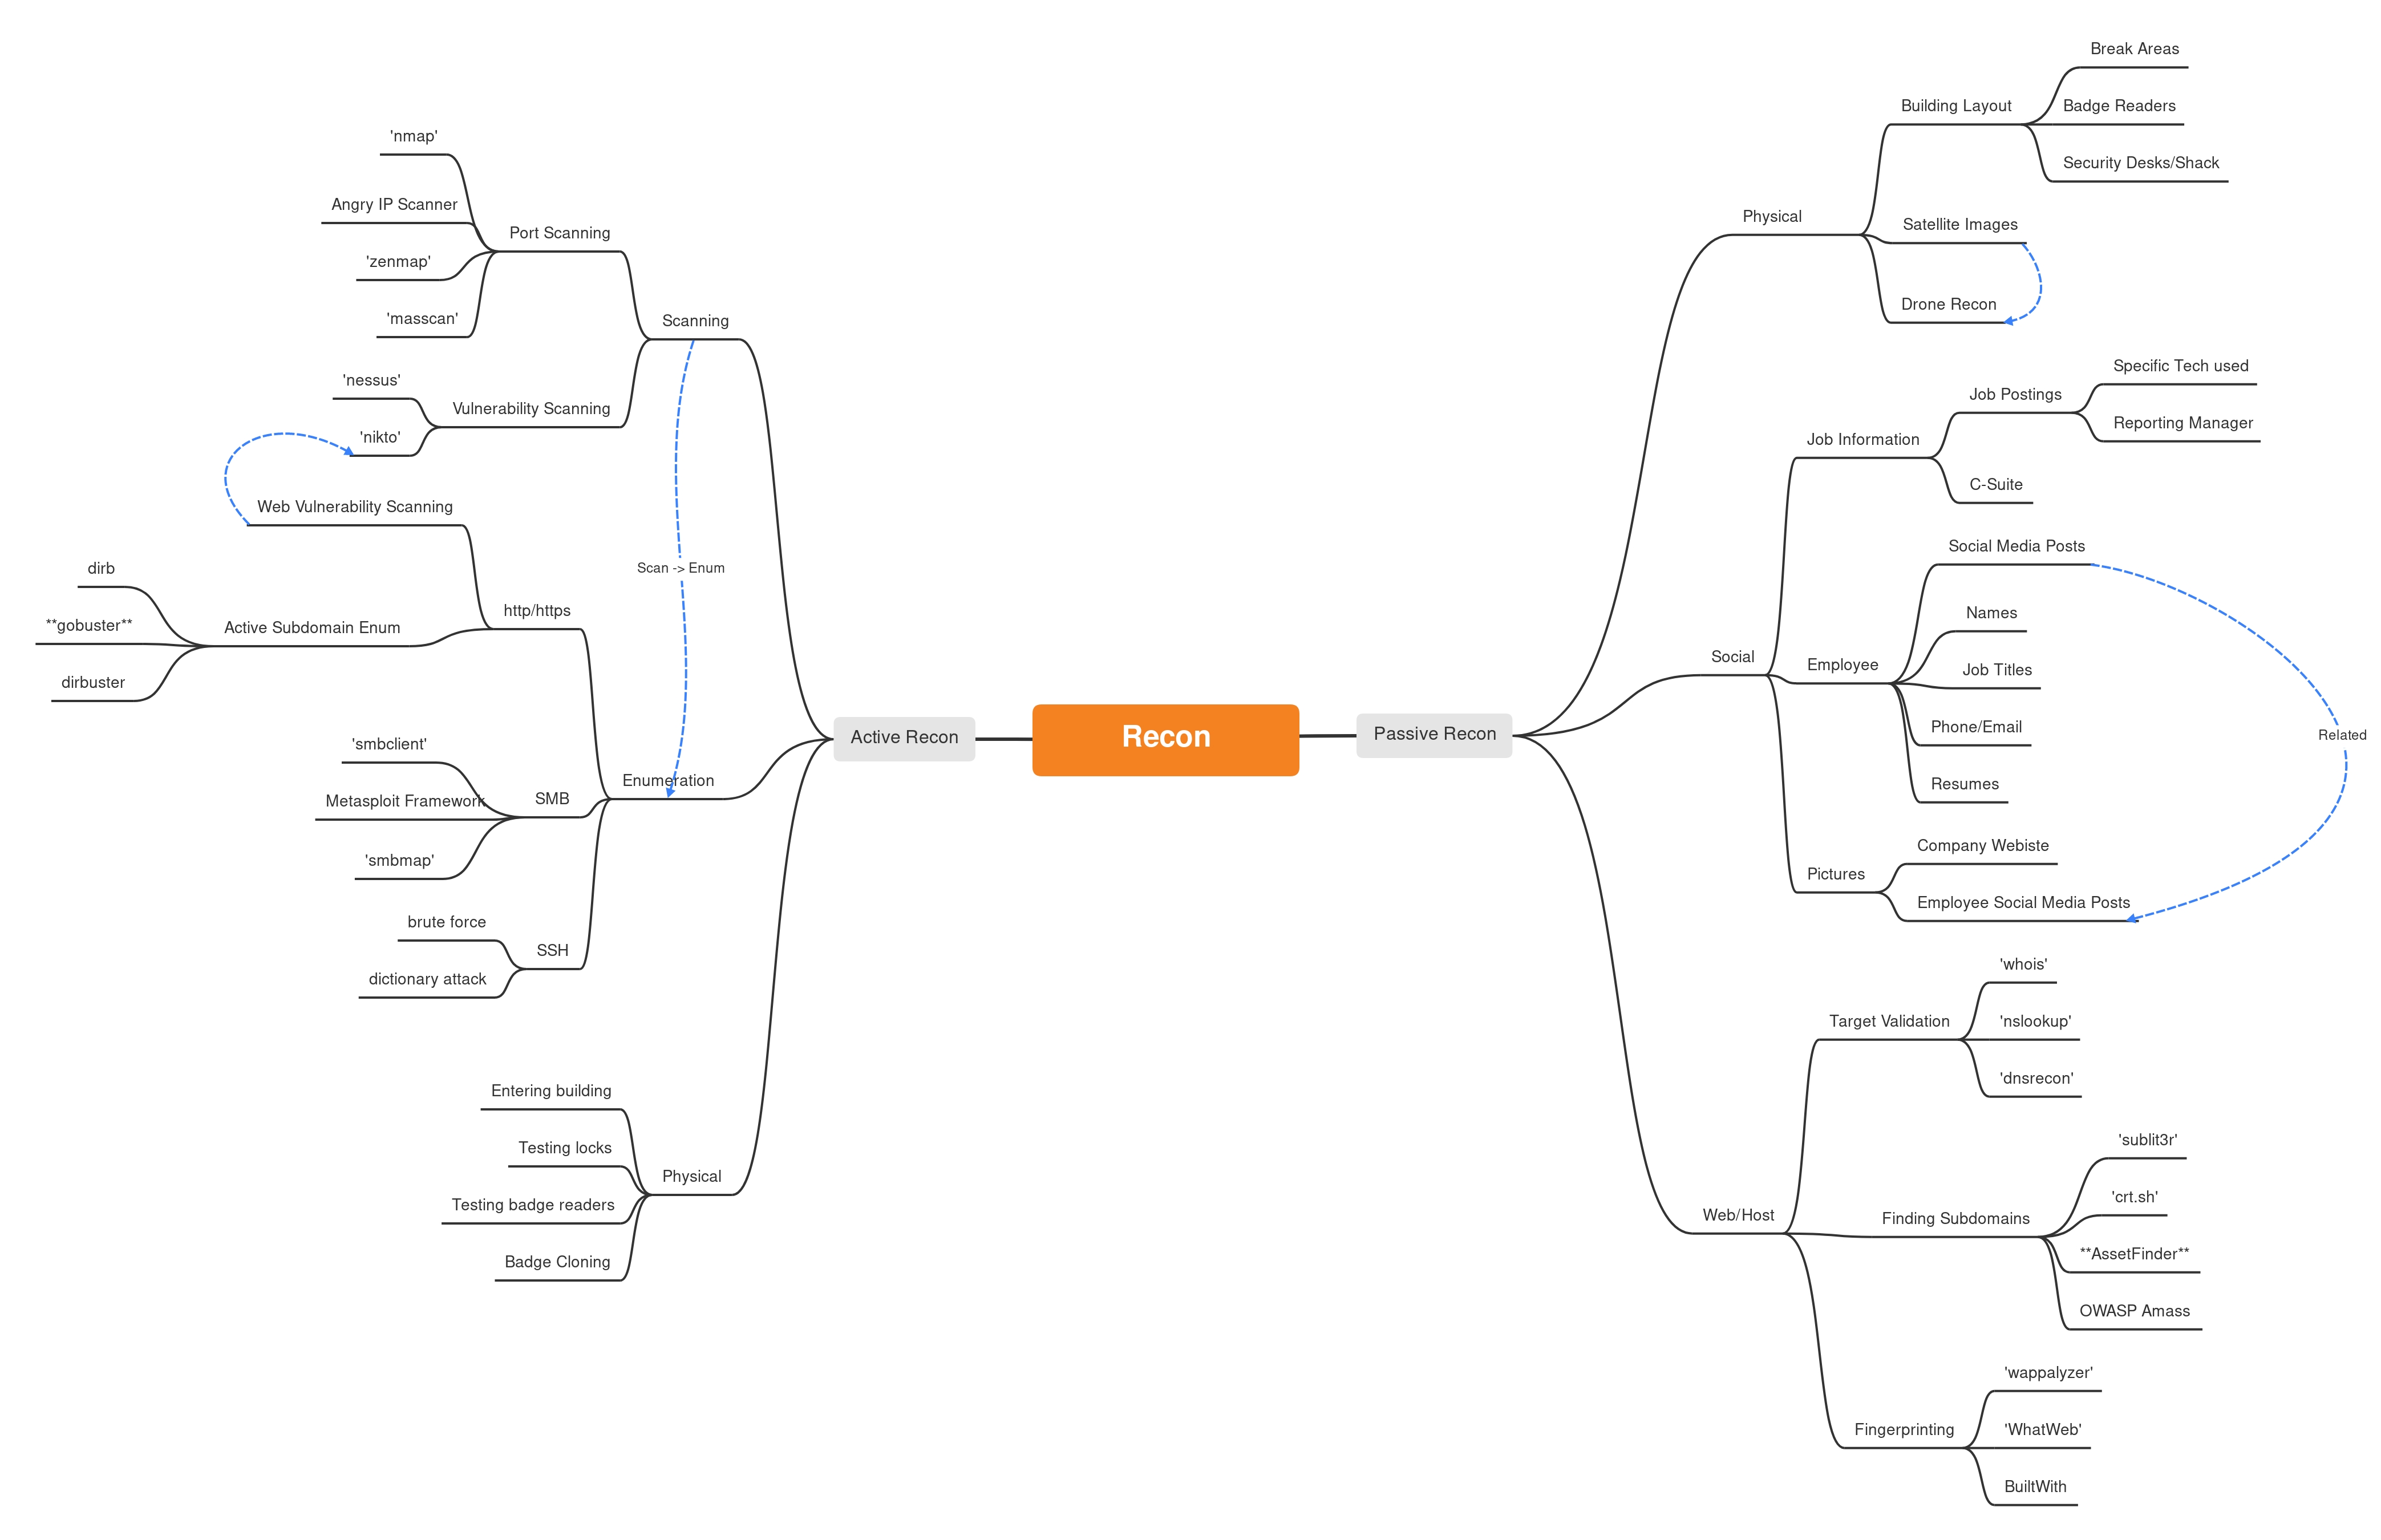
Straight to the point, passive reconnaissance includes any investigation without directly interacting with the target. Contrary to that fact, active reconnaisance includes any recon that involves direct interaction with the victim network/system. Effective Reconnaissance uses many, if not all available OSINT tools to gather and obtain as much information as possible. Since each tool is unique, one tool or resource may pull different information than another. There’s no such thing as too much information during the reconnaissance phase. For further tools that weren’t mentioned in this post, check out the GitHub-OSINT topic. There are tons of great community built tools to install and utilize! Feel free to reference an utilize the mini mind-map I’ve put together below for additional reference to tools and recon methodology.